7. Server Connections
Configure your server connections to publish your data and metadata to.
Check the Server requirements to check what versions of the different connection types are compatible with GeoCat Bridge.
Add new connection
Click New  and choose one of the supported server connection types to create a new server:
GeoCat Live
GeoServer
MapServer
PostGIS
GeoNetwork
CSW

Add a new server
GeoCat Bridge can also import server connections from Bridge 2, click  to open the import server connections form, see Import Server Connections
GeoCat Live
GeoCat Live is a SDI platform hosted by GeoCat. Depending on your GeoCat Live configuration Bridge is able to publish metadata to a catalogue server (CSW) and the layers of the map to a mapserver (WMS/WFS/WCS/WMTS). Components used
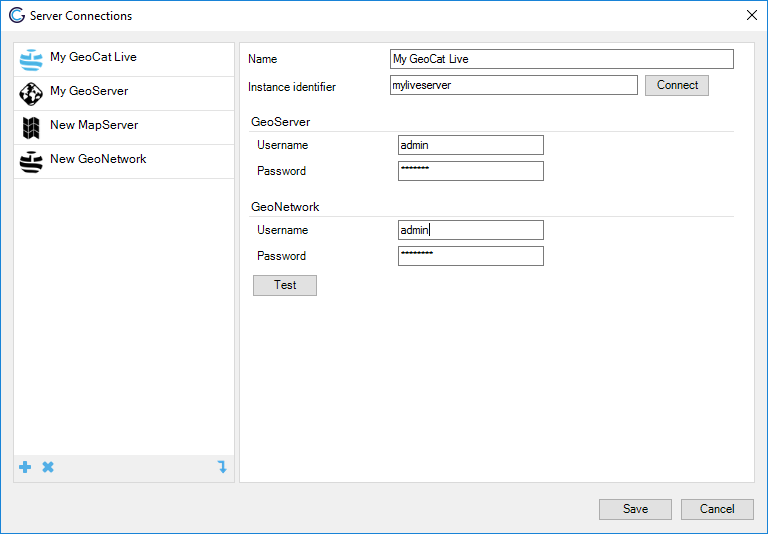
GeoCat Live server configuration
To configure a GeoCat Live connection first fill in the instance identifier and then click connect. This will retrieve the available server connections for the GeoCat Live instance you are connecting to. GeoCat Live connection in the figure above has a GeoServer and GeoNetwork connection available. For both the credentials need to be supplied. When publishing Bridge will publish automatically to all available server connections of your Live instance.
Name |
Name of the server connection |
Instance identifier |
Identifier that uniquely identifies the instance |
GeoServer username/password |
Credentials of a user with privileges to publish |
GeoNetwork username/password |
Credentials of a user with privileges to publish |
GeoNetwork or generic CSW connection
Configure a GeoNetwork or generic CSW connection to publish your metadata to an online catalogue. If the catalog is GeoNetwork then preferably use a GeoNetwork connection. Using the GeoNetwork connection allows to publish also a thumbnail for the dataset.
A CSW server should support CSW-transactions to be able to publish to it with Bridge.
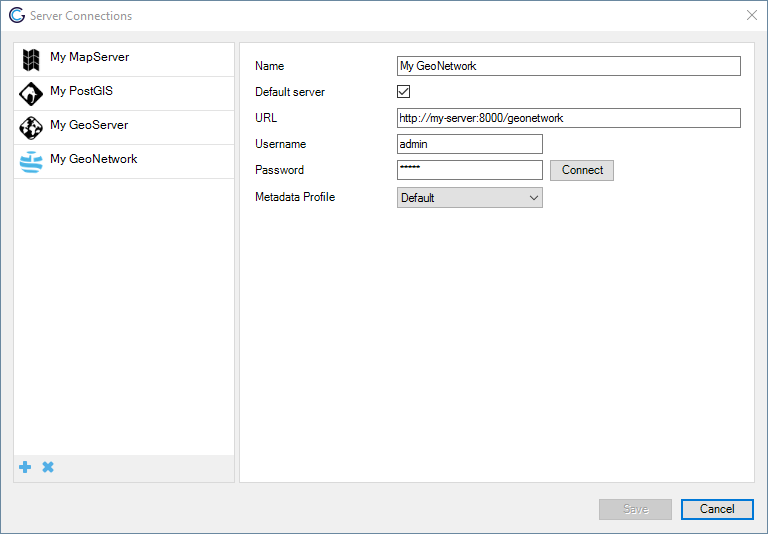
GeoNetwork server configuration
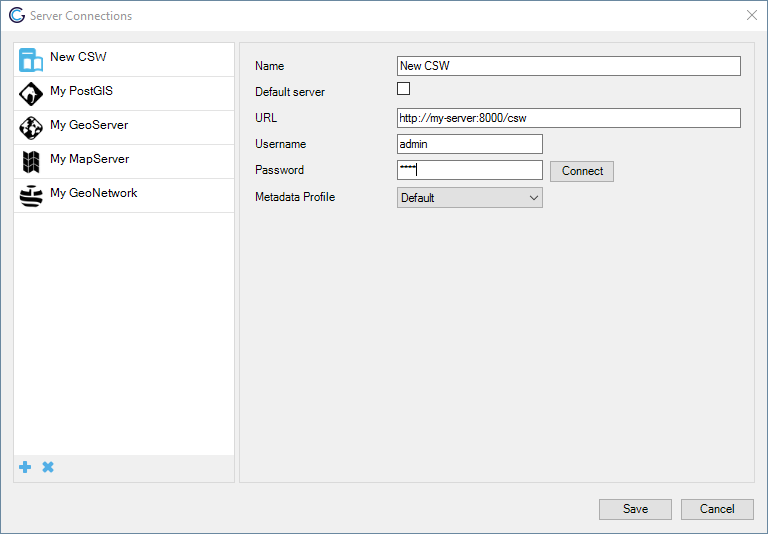
CSW server configuration
Name |
Name of the server connection |
Url |
Base url of the catalog server |
Username/password |
Credentials of a user with privileges to publish |
Default server |
Set as default server |
Metadata profile |
Choose the metadata profile |
Click Connect to test the server connection.
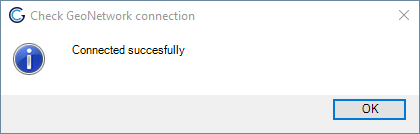
Server connection test
GeoServer connection
Configure a GeoServer connection to publish your data to GeoServer.
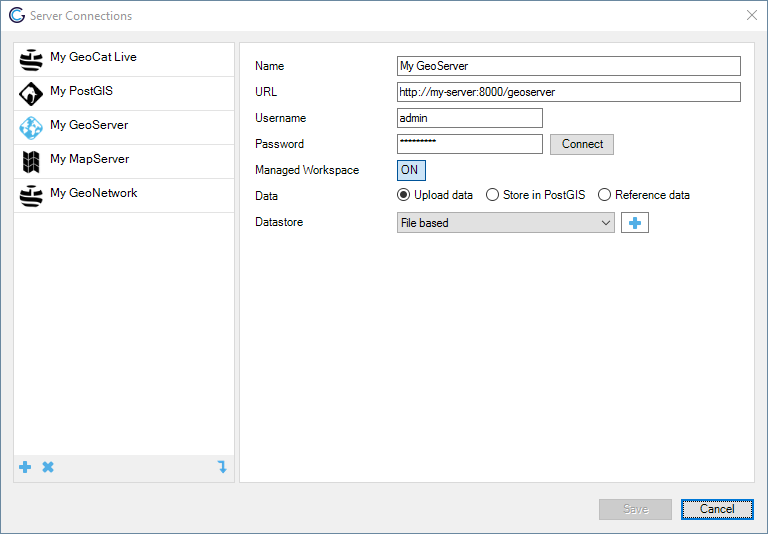
GeoServer server configuration
Fill the form fields.
Name |
Name of the server connection |
|
|---|---|---|
Default |
Set as default server |
|
Url |
Base url of the GeoServer server |
|
Username/password |
Credentials of a user with privileges to publish |
|
Managed workspace |
Each ArcMap project (.mxd) represents 1 geoserver workspace |
|
Workspace |
If not |
|
Datastore |
Select the datastore to store data in |
|
Data management |
||
Upload data |
Upload data to GeoServer using Shapefile or GeoPackage and GeoTIFF. |
|
Store in PostGIS |
Store data in PostGIS through direct connection with PostGIS database. This option requires the database to be accessible locally (by ArcMAP). |
|
Reference data |
Publish data in GeoServer by referencing existing data from a database. |
With the option Upload data there is an additional option to select a File based storage or Database storage. To enable storage in a database select an existing GeoServer Datastore or create a new Datastore by clicking “+”. The database connection details are relative to the remote GeoServer. There is no need to expose the database locally. The database user should have create and write privileges on the database.
When using Reference data, Bridge currently only supports Oracle databases. Make sure to use MDSYS.SDO_GEOMETRY in stead of SDE.ST_GEOMETRY to store geometries in Oracle and the data is spatially indexed. Oracle layers can be exposed to ArcMAP via ArcSDE.
Managed Workspace
When this option is turned on, Bridge will manage about the workspaces in GeoServer by enforcing a one to one relationship between ESRI map projects (.mxd) and workspaces. When publishing a mapdocument_a.mxd with layer layer_a and layer_b, bridge will create a new workspace mapdocument_a in GeoServer and publish both layers in this workspace. Workspace mode is required if you want to publish layers in a hierarchy similar to the ArcMAP Table of Contents. Note that layers will be removed from GeoServer if they don’t exist in the local mxd anymore. When this option is turned off you have to select a workspace in which published layers will be published as part of the server configuration, no layers are removed automatically.
PostGIS connection
Configure a PostGIS connection to publish your map data to PostGIS. The PostGIS connection can be used in three different publish scenarios:
Publish only map data to PostGIS
Publish map layers to GeoServer and store data directly in PostGIS using a direct database connection
Publish map layers to MapServer and store data directly in PostGIS using a direct database connection

PostGIS server configuration
MapServer connection
MapServer uses Managed Workspaces mode by default. A mapserver endpoint (mapfile) is created for each local ArcMAP project.
Configure a MapServer connection to publish your maps from ArcGIS Desktop® to MapServer. When using Mapserver 4 Windows choose Use default MS4W values to fill out the MapServer details form.
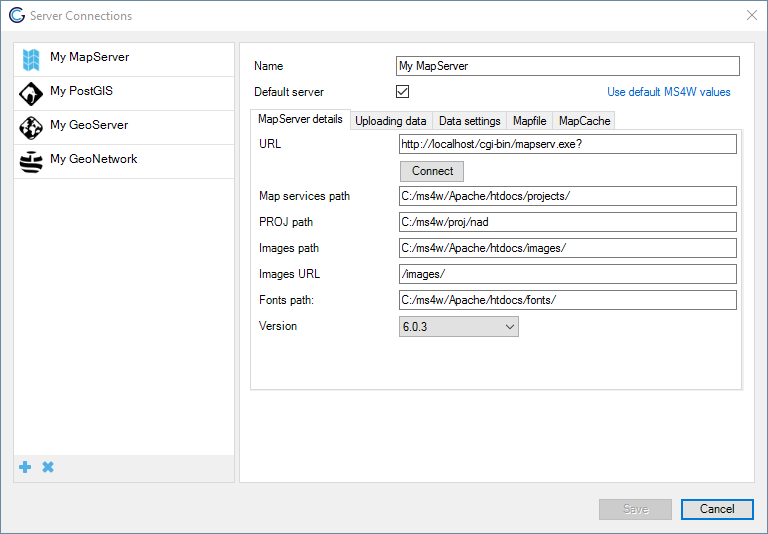
MapServer server configuration
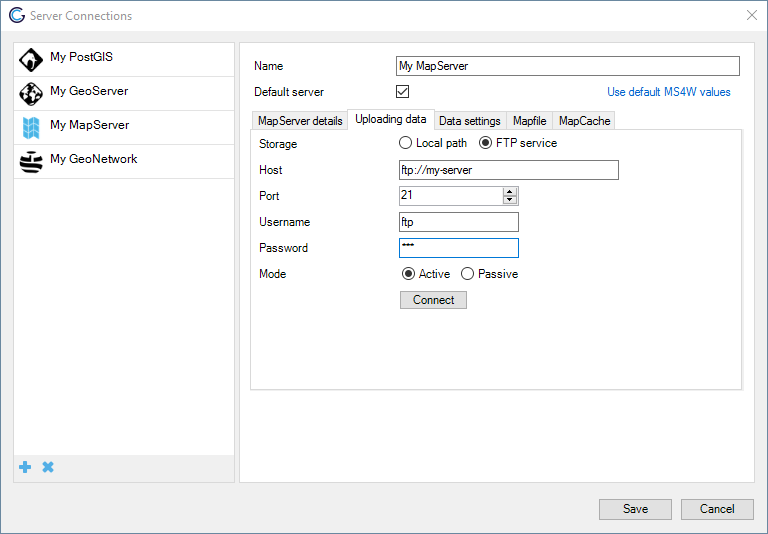
In the Uploading data tab configure how Bridge stores data for your MapServer connection. Choose Local path to store the files in a location on the local file system. Choose FTP service to transmit the files over FTP to the MapServer server.
Managed workspace
Bridge currently does not offer functionality to deactivate managed workspace for Mapserver. This means that each ArcMap project is published as a single service endpoint (mapfile).
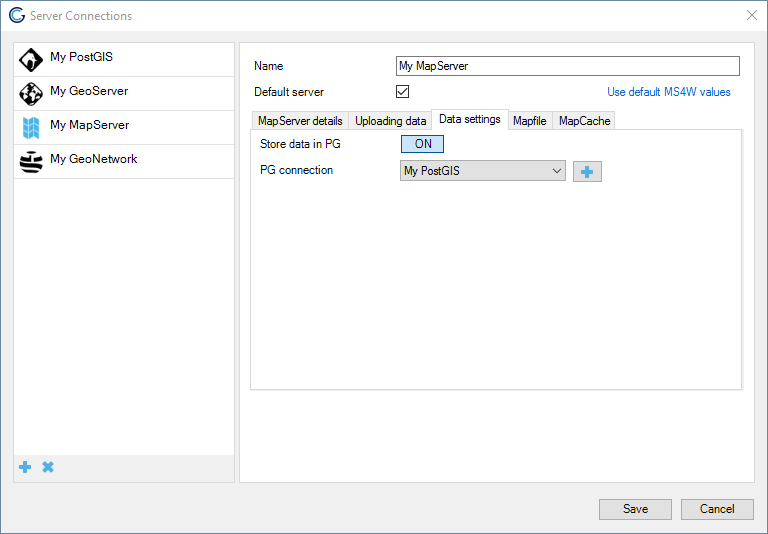
MapServer data connection
In the Data settings tab enable Store data in PG to have Bridge store vector data in a PostGIS database. When enabled you can choose a connection from the available PostGIS connections. To create a new PostGIS connection see PostGIS connection.
MapServer PostGIS configuration
Copy fonts to MapServer
Bridge can be configured to copy the fonts used in your symbology to MapServer. See CopyFontsMapServer for more details.
MapCache configuration
With the MapCache module of GeoCat Bridge you can configure a MapCache instance to serve map tiles. The MapCache module does not manage the seeding of map tiles.
MapCache requirements
With the MapCache module Bridge can configure one Mapcache instance per MapServer. This means that all the mapfiles will share one endpoint for the tile cache. To have Mapcache reload the configuration after each change to the configuration file it is required to have MapCache installed with FastCGI.
Installation instructions for MapCache with FastCGI on Ubuntu 14.04:
For MapCache to auto refresh the configuration MapCache with FastCGI is a prerequisite. To install Mapcache with FastCGI you need to install the following packages:
mapcache-cgi (version 1.2.1-2)
libapache2-mod-fcgid (version 1:2.3.9-1)
Install with:
sudo apt-get install mapcache-cgi libapache2-mod-fcgi
Enable the FastCGI apache module with:
sudo a2enmod fcgid
Add the following snippet to the Apache virtual host (located on Ubuntu on /etc/apache2/sites-enabled/000-default.conf) to enable the MapCache service:
<IfModule mod_fcgid.c>
FcgidIOTimeout 120
FcgidInitialEnv "MAPCACHE_CONFIG_FILE" "/home/user/ftp/projects/mapcache.xml"
<Location /map.fcgi>
Order Allow,Deny
Allow from all
SetHandler fcgid-script
</Location>
ScriptAlias /map.fcgi "/usr/lib/cgi-bin/mapcache"
</IfModule>
Restart the Apache service:
sudo apachectl restart
Check whether MapCache is running correctly by visiting the following url in your browser (assuming that the Mapcache configuration file has the demo service enabled): http://localhost/map.fcgi/demo
FTP setup
When republishing a Mapcache for a layer Bridge will delete the cached tiles from the temp folder path for that layer by FTP. This means that the temp folder needs to be accessible and writable by the FTP user. Therefore the Mapcache FTP configuration consists of two fields:
Path to tmp folder –> Absolute path to tmp folder on server
FTP path to tmp folder –> Path to tmp folder that is accessible for ftp user
In the scenario that FTP user is not allowed to venture outside of its home folder it is advised to mount the Mapcache temp folder in the FTP users home directory like this:
mkdir /home/user/ftp/mapcache-temp
mount --bind /tmp/mapcache/ /home/user/ftp/mapcache-temp
For the configuration of the Mapcache this means the following values:
Path to tmp folder –>
/tmp/mapcacheFTP path to tmp folder –>
/mapcache-temp
In the scenario that the FTP user has direct access to the Mapcache temp folder the same values can be supplied:
Path to tmp folder –>
/tmp/mapcacheFTP path to tmp folder –>
/tmp/mapcache
File permissions
MapCache needs sufficient permissions to write the tiles to the temporary folder. Therefore the temporary MapCache folder should be owned by the www-data user and www-data group.
sudo chown www-data:www-data /tmp/mapcache
The FTP user also needs permissions to delete tiles from the temporary folder. SO the FTP users needs to be added to the www-data group and the File Acces Control list for the MapCache folder needs to be modified, so all files created in the MapCache temp folder are writable by group members.
usermod -g www-data user
sudo chmod g+s /tmp/mapcache/
sudo setfacl -d -m g::rwx /tmp/mapcache/
sudo setfacl -d -m o::rx /tmp/mapcache/
The MapCache configuration file
The MapCache configuration file generated by Bridge will look like this:
<?xml version="1.0" encoding="utf-16"?>
<mapcache>
<cache name="disk" type="disk">
  <base>/tmp/mapcache</base>
  <symlink_blank />
</cache>
<service type="wmts" enabled="true" />
<service type="tms" enabled="true" />
<service type="kml" enabled="true" />
<service type="gmaps" enabled="true" />
<service type="ve" enabled="true" />
<service type="mapguide" enabled="true" />
<service type="demo" enabled="true" />
<service type="wms" enabled="true">
  <full_wms>assemble</full_wms>
  <resample_mode>bilinear</resample_mode>
  <maxsize>4096</maxsize>
</service>
<source name="mxdname:layername" type="wms">
  <getmap>
    <params>
      <format>image/png</format>
      <LAYERS>sites</LAYERS>
    </params>
  </getmap>
  <http>
    <url>http://host/cgi-bin/mapserv?map=pathtomapfile</url>
  </http>
</source>
<tileset name="mxdname:layername">
  <source>mxdname:layername</source>
  <cache>disk</cache>
  <grid>g</grid>
  <grid>WGS84</grid>
  <grid>GoogleMapsCompatible</grid>
  <format>PNG</format>
  <metatile>5 5</metatile>
  <metabuffer>10</metabuffer>
  <expires>3600</expires>
  <metadata>
    <title />
    <abstract />
  </metadata>
</tileset>
<errors>report</errors>
<lock_dir>/tmp/mapcache</lock_dir>
<auto_reload>true</auto_reload>
<default_format>JPEG</default_format>
</mapcache>
Any new layers published will be inserted in the MapCache configuration file. By default for each layer a tile cache is configured for the following projections:
epsg:4326
epsg:3857
epsg:900913
To generate a tile cache for a different projection you will need to publish your layer to MapServer with that projection enabled and insert a tiling definition scheme in the MapCache configuration file. It should be inserted as a direct child of the Mapcache element. For instance a tiling scheme for RD_NEW (epsg:28992) is:
<grid name="rd">
        <metadata>
                <title>Rijksdriehoekstelsel</title>
        </metadata>
        <!--extent>12000,304000,280000,620000</extent-->
        <!--extent>98827,469579,142183,502096</extent--> <!-- Extent adam -->
        <extent>-285401.920,22598.080,595401.920,903401.920</extent>
        <srs>EPSG:28992</srs>
        <resolutions>3440.64 1720.32 860.16 430.08 215.04 107.52 53.76 26.88 13.44 6.72 3.36 1.68 0.84 0.42 0.21</resolutions>
        <units>m</units>
        <size>256 256</size>
</grid>
After inserting the tiling scheme in the MapCache configuration file, all future published layers will have a tile cache configured for that projection.
Mapcache configuration in Bridge
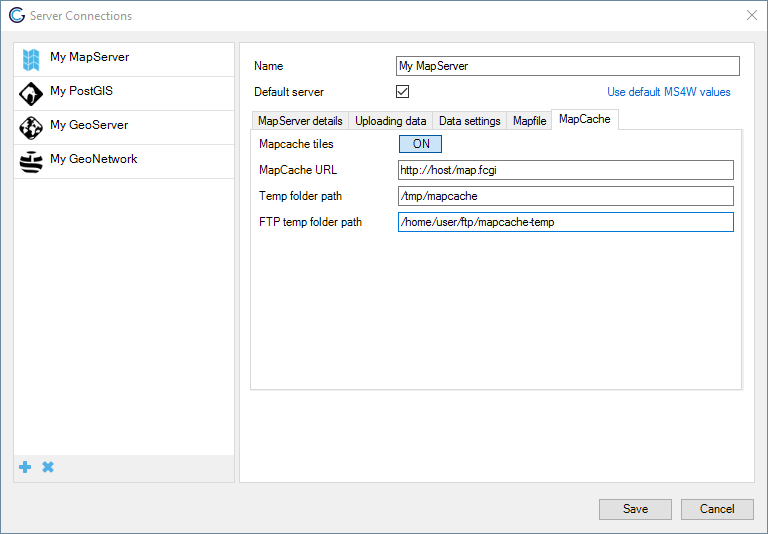
When the MapCache server is running at http://host/map.fcgi, the temp directory is /tmp/mapcache and this folder is accessible for the FTP user through /home/user/ftp/mapcache-temp, configure the MapCache connection in the PostGIS tab of the MapServer connection like this, but replace the correct values for user and host:
Import Server Connections
Bridge can import server connections from a previous Bridge 2 installation. Click on to open the import server connections form. When Bridge detects a Bridge 2 configuration database on your machine, Bridge will display the following notice. Otherwise click the Folder button to browse to the Bridge 2 configuration database with the server connections to import (filename arcgis_publisher.s3db and should be located in the users LocalApplicationData directory C:\Users\<USER>\AppData\Local\GeoCat\Bridge 2).
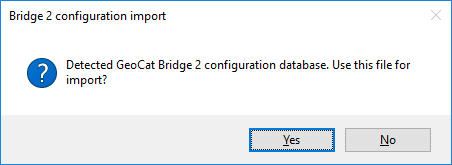
Bridge 2 config database detected
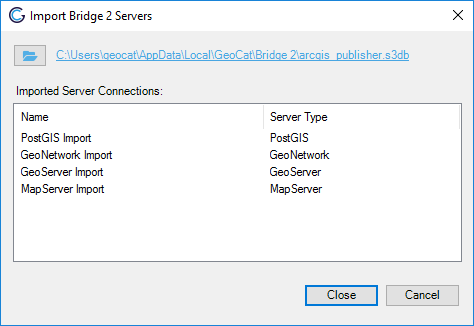
Click OK to load the path in the import server connections form, then click Import to import the servers. On a successful import Bridge shows the following:
Succesful import of server connections