Installation
In this section you will find information about how to install GeoNetwork Enterprise. GeoNetwork Enterprise is provided as a Web Archive for use with your application server.
Reference:
Requirements
GeoNetwork can run either on MS Windows, Linux or Mac OS X. This document describes installation on MS Windows and Linux.
Some general system requirements for the software to run without problems are listed below:
Memory (RAM) : 2 GB or higher
Disk Space : Minimum of 512MB of free disk space to install the application. Additional space is required depending on the amount of spatial data that you expect to upload, a minimum of 4 GB is recommended.
Downloading the Geonetwork Enterprise archive file
GeoNetwork can be installed using a Web Archive file. The Web Archive contains GeoNetwork Enterprise as a web-application, which can be deployed in an application server.
The GeoNetwork Enterprise archive file is available to GeoCat users in the Nexus Repository Manager. Follow these steps to download it:
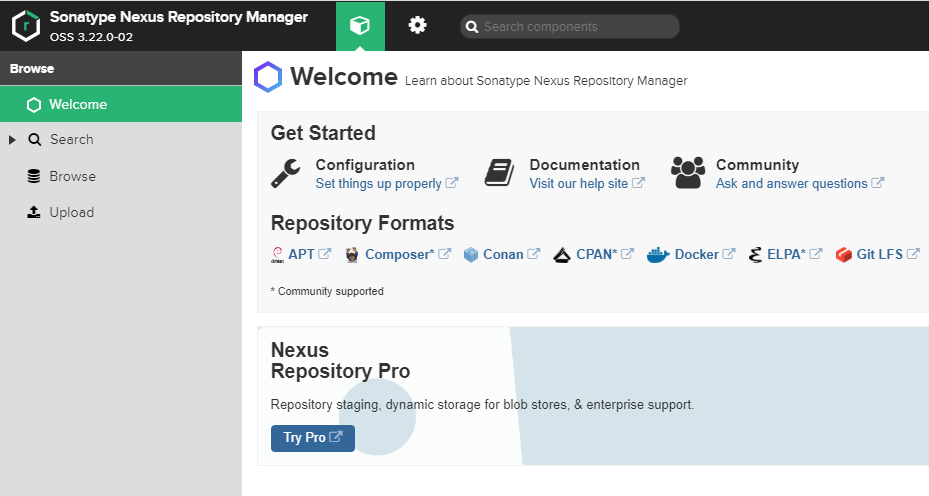
Open your Web browser and navigate to https://nexus.geocat.net. Log in with your credentials.
Move to the Browser section and locate the enterprise folder.
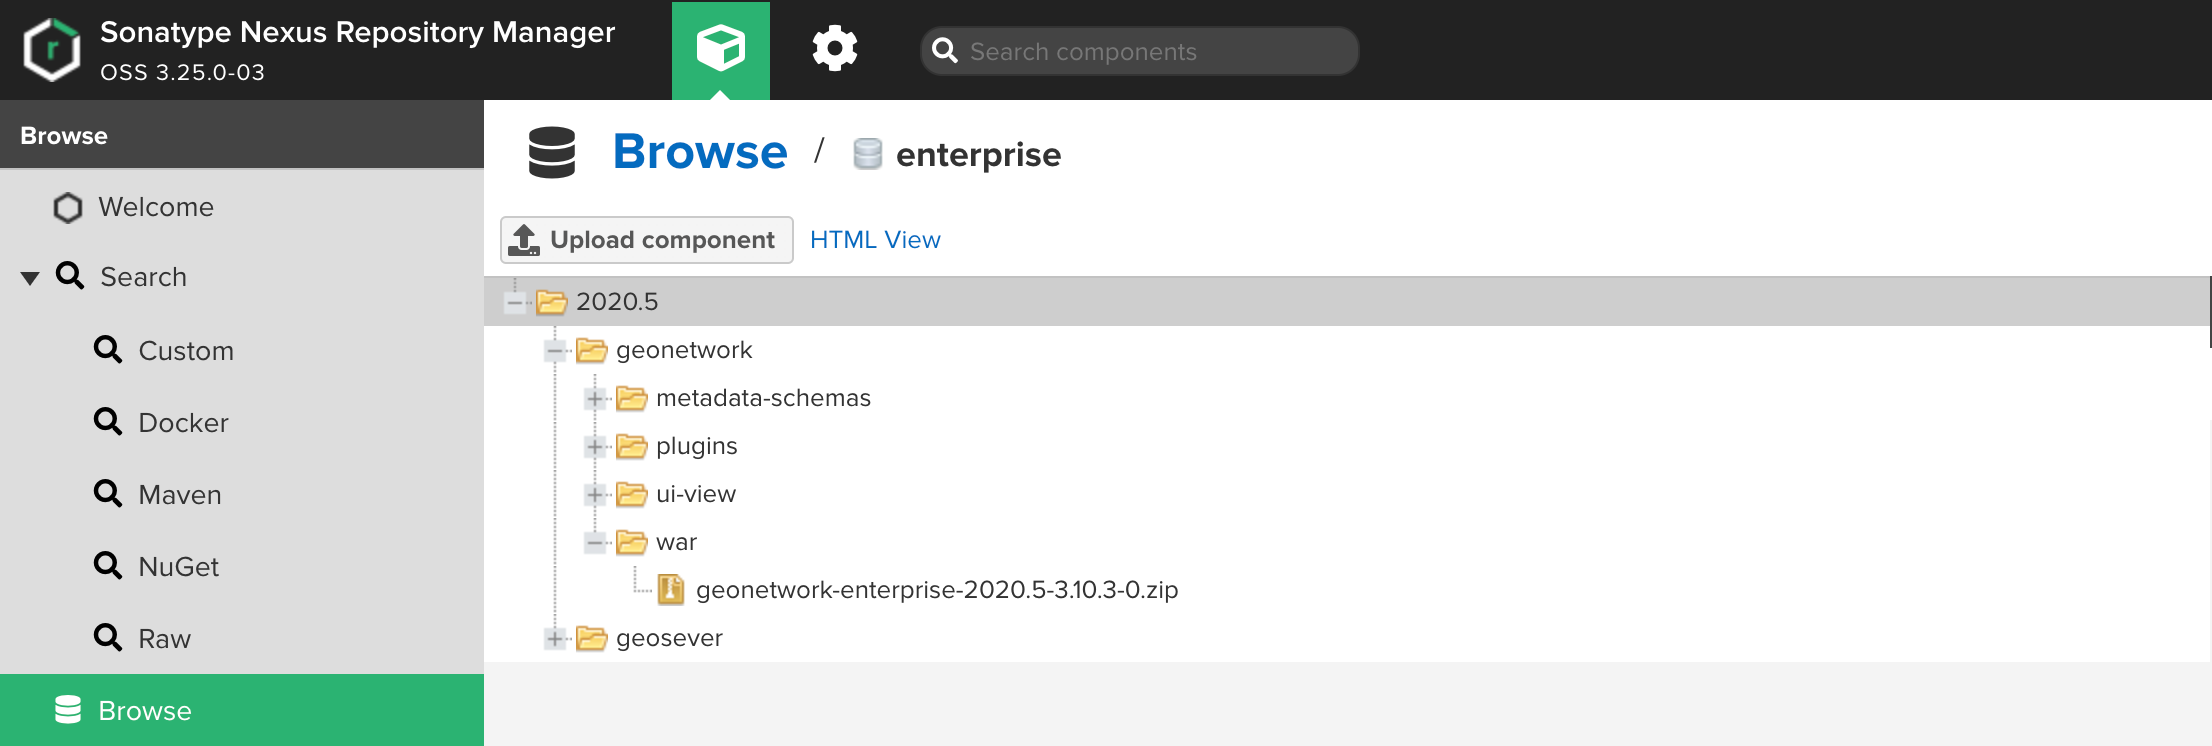
Open the folder 2020.5/geonetwork/war and locate the package containing the most recent version. Expand it and click on the
zipfile it contains.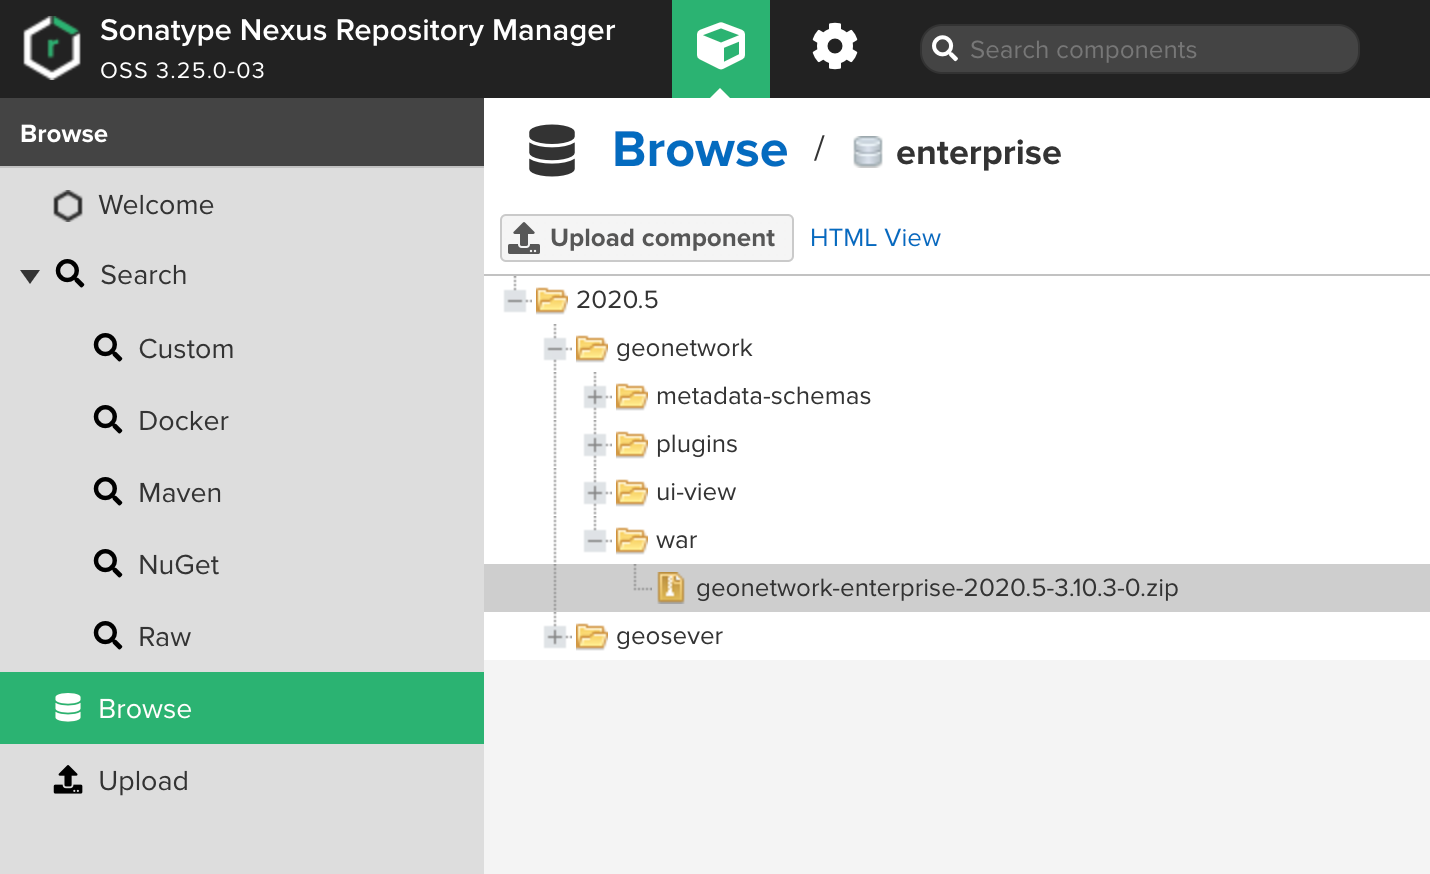
In the file properties, download the path link to download the
zipfile (it contains awarinside).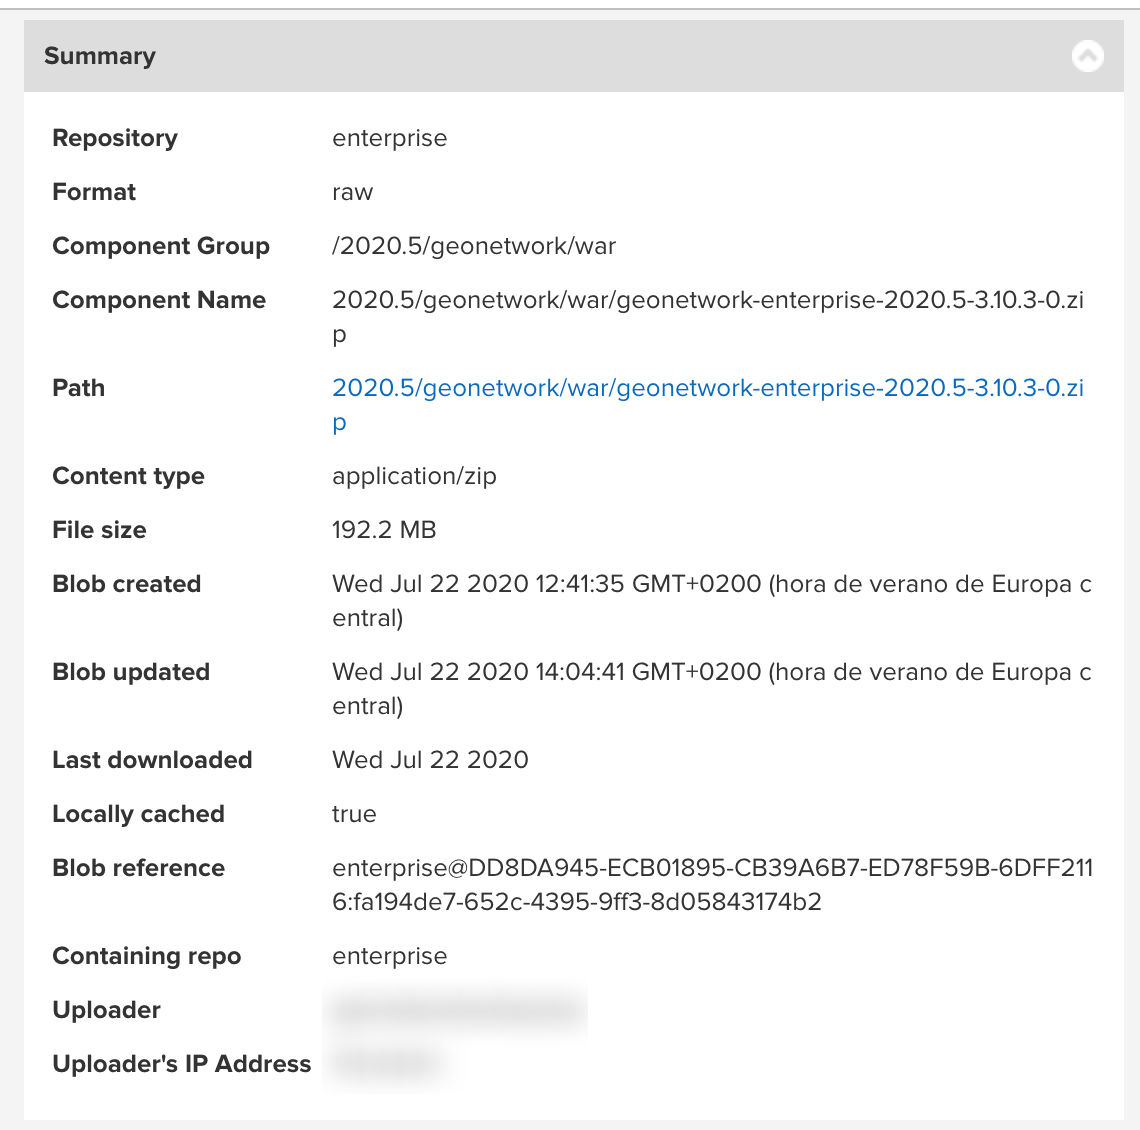
Installing a Java JDK
GeoNetwork Enterprise requires a Java 8 JDK. Do not install the most recent Java version (Java 11 at the time of writing this document), since GeoNetwork Enterprise does not support it yet.
OpenJDK is now the lead project for the Java ecosystem.
If you are running Windows, follow these steps to install the OpenJDK JDK:
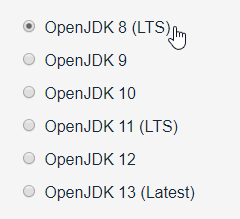
Navigate to the AdoptOpenJDK download page
Select OpenJDK 8 (LTS) as the version to download.
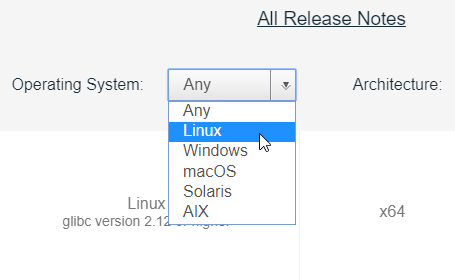
Select Windows as your Operating System and x64 as your architecture.
Click on the available JDK msi file download link for the above selected options, to download the OpenJDK prebuilt binary.

Run the downloaded msi file and follow the instructions of the installer. When prompted about the features to install, select the Set JAVA_HOME variable (it is disabled by default)
When the installation is over, to ensure that Java is now correctly installed, open a console and type java -version. The output should look something like this:
> java -version
openjdk version "1.8.0_242"
OpenJDK Runtime Environment (AdoptOpenJDK)(build 1.8.0_242-b08)
OpenJDK 64-Bit Server VM (AdoptOpenJDK)(build 25.242-b08, mixed mode)
If you are running Linux, it’s recommended to install the Java 8 JDK corresponding to your distribution. Otherwise, if you want to install the OpenJDK one, follow these steps in Ubuntu (other Linux versions may require a different install process):
Open a terminal and update your package index by running:
$ sudo apt updateInstall Java 8 by running:
$ sudo apt install openjdk-8-jdk
Installing an application server
Tomcat is one of the most popular Applications Servers. We recommend using Tomcat 8.5 to run GeoNetwork Enterprise.
If you are running Windows, follow these step to install Tomcat:
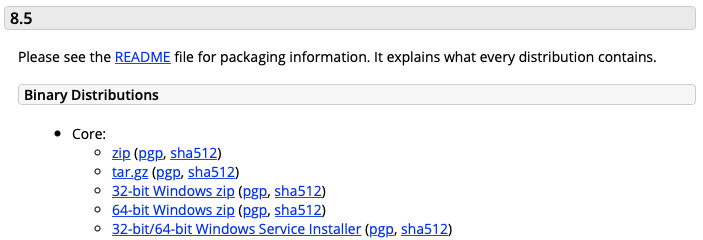
Visit the Apache Tomcat Download page:
Apache Tomcat 8.5.x (Recommended)
Under Binary Distirbutions download 32-bit/64-bit Windows Service Installer (pgp, sha512).
Download 32-bit/64-bit Windows Service Installer
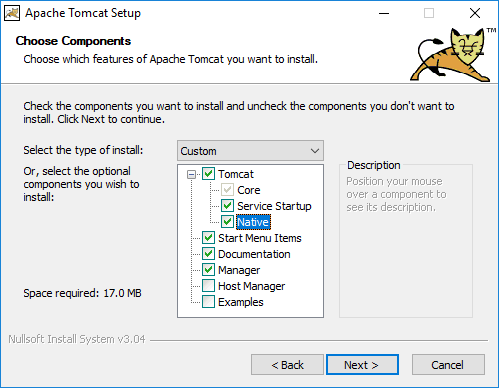
Run the installer file. When prompted for the elements to install, check the Native and Service Startup options.
Installation options
To manually install Apache Tomcat on Linux, follow these steps to install Tomcat:
Download a Tomcat package (.tar.gz file in /bin folder)
Extract the package:
$ tar xvzf apache-tomcat-$TOMCAT_VERSION.tar.gz
Move the extracted folder into a dedicated directory:
$ sudo mv apache-tomcat-$TOMCAT_VERSION /usr/local/example/path/to/tomcat
Edit your
~/.bashrcfile to define the JAVA_HOME and CATALINA_HOME variables, needed for Tomcat to run. These should point to the paths where you have installed Java and Tomcat respectively. Add the following lines to the file, adapting the paths accordingly:export JAVA_HOME=/usr/lib/path/to/java export CATALINA_HOME=/path/to/tomcat
Starting/stopping Tomcat
To start the Tomcat server, follow these steps:
Navigate to the Tomcat bin folder (CATALINA_HOME/bin)
Run
startup(or./startup.shif you are running Linux)
To stop the server, do:
Navigate to the Tomcat bin folder (CATALINA_HOME/bin)
Run
shutdown(or./shutdown.shif you are running Linux)
Deploying GeoNetwork Enterprise
To install GeoNetwork Enterprise on your existing Tomcat instance, follow these steps:
Copy the downloaded war file to the
$CATALINA_HOME/webappsfolder.Start Tomcat.
Configuring Database management
GeoNetwork Enterprise is bundle with a H2 database, the following sections describe how to configure GeoNetwork to use your database. The database connection can be configured using Java Naming and Directory Interface (JNDI) or a direct database connection.
Java Naming and Directory Interface (JNDI) configuration
Java Naming and Directory Interface (JNDI) provides naming and directory functionality to applications written in Java and is the optimal choice in production situations, because it doesn’t require configuration script updates at (re)deployment. JNDI is set up at the container level (e.g. Tomcat).
To configure GeoNetwork to use JNDI, follow these steps:
Add in
JAVA_OPTSthe following parameter.-Dgeonetwork.db.type=jndi
As an alternative can be defined the following environmental variable:
GEONETWORK_DB_TYPE.export GEONETWORK_DB_TYPE=jndi
Download one of the following
geonetwork.xmlfiles, depending on the database that you are using.geonetwork.xml(for H2 databases)geonetwork.xml(for Postgres databases)geonetwork.xml(for Oracle databases)
Copy the file to the
$CATALINA_HOME/conf/Catalina/localhostfolder.Place the corresponding jar for the driver you want to use in the
$CATALINA_HOME/libfolder. JDBC drivers can be obtained for the different databases:Oracle: https://www.oracle.com/database/technologies/appdev/jdbc-downloads.html
SqlServer: https://docs.microsoft.com/en-us/sql/connect/jdbc/download-microsoft-jdbc-driver-for-sql-server
Postgres: The driver is bundle with GeoNetwork, please copy the file
$CATALINA_HOME/webapps/geonetwork/WEB-INF/lib/postgresql-9.4.1211.jar.MySql: The driver is bundle with GeoNetwork, please copy the file
$CATALINA_HOME/webapps/geonetwork/WEB-INF/lib/mysql-connector-java-5.1.38.jar.
Postgres JNDI configuration example
For a Postgres database use the corresponding file linked above, configuring the following parameters:
url: JDBC connection string for Postgresql database, typically fill the hostname/port/database name. See additional parameters in https://jdbc.postgresql.org/documentation/head/connect.htmlusername: database username with read/write permissions in the databasepassword: database user password.For other parameters check additional documentation in https://tomcat.apache.org/tomcat-8.5-doc/jndi-resources-howto.html#JDBC_Data_Sources
<Context>
  <Environment name="gnDatabaseDialect" value="POSTGRESQL" type="java.lang.String" override="false"/>
  <Resource name="jdbc/geonetwork" auth="Container"
            factory="org.apache.tomcat.jdbc.pool.DataSourceFactory"
            type="javax.sql.DataSource" driverClassName="org.postgresql.Driver"
            url="jdbc:postgresql://localhost:5432/postgres"
            username="postgres" password="postgres"
            maxActive="20" maxIdle="10" defaultAutoCommit="false" maxWait="-1"/>
</Context>
Once configured, copy the file it to $CATALINA_HOME/conf/Catalina/localhost.
Copy the Postgresql JDBC driver to $CATALINA_HOME/lib.
Postgis support
Additionally if you want to enable the spatial index to be stored in Postgis, you should add the Postgis extension to your database:
CREATE EXTENSION postgis;
See additional details in https://postgis.net/install/
And uncomment the following Spring beans in the file $CATALINA_HOME/webapps/geonetwork/WEB-INF/config-db/jndi.xml:
<!-- Enable for PostGis configuration with JNDI -->
<bean id="datastoreFactory" class="org.geotools.data.postgis.PostgisNGJNDIDataStoreFactory"/>
<bean id="datastore" factory-bean="datastoreFactory" factory-method="createDataStore">
 <constructor-arg>
   <map>
     <description>The datastore factory parameters see Geotools documentation for details.
       http://docs.geotools.org/latest/userguide/library/data/datastore.html
     </description>
     <entry key="dbtype" value="postgis"/>
     <entry key="Data Source" value-ref="jdbcDataSource"/>
     <entry key="Loose bbox" value="true"/>
     <entry key="Estimated extends" value="true"/>
     <entry key="encode functions" value="true"/>
     <entry key="validate connections" value="true"/>
     <entry key="fetch size" value="1000"/>
     <entry key="Expose primary keys" value="true"/>
   </map>
 </constructor-arg>
</bean>
Direct database connection
Using JAVA_OPTS, adding the following parameters:
Type of database (
geonetwork.db). Valid values are :h2,postgres,sqlserver,mysql,oracle,db2,postgres-postgis.Example for postgres:
-Dgeonetwork.db.type=postgresDatabase connection parameters:
jdbc.database=DATABASE_NAME
jdbc.username=DATABASE_USERNAME
jdbc.password=DATABASE_PASSWORD
jdbc.host=DATABASE_HOSTNAME
jdbc.port=DATABASE_PORT
Postgres connection example:
-Djdbc.database=geonetworkdb
-Djdbc.username=geonetwork
-Djdbc.password=mypassword
-Djdbc.host=localhost
-Djdbc.port=5436
Alternatively can be configured using environment variables. The following environment variable can also be for connecting to the database:
GEONETWORK_DB_TYPE
GEONETWORK_DB_HOST
GEONETWORK_DB_PORT
GEONETWORK_DB_NAME
GEONETWORK_DB_USERNAME
GEONETWORK_DB_PASSWORD
GEONETWORK_DB_CONNECTION_PROPERTIES
Postgres connection example:
export GEONETWORK_DB_TYPE=postgres
export GEONETWORK_DB_HOST=localhost
export GEONETWORK_DB_PORT=5436
export GEONETWORK_DB_NAME=geonetworkdb
export GEONETWORK_DB_USERNAME=geonetwork
export GEONETWORK_DB_PASSWORD=mypassword
Postgres and MySql JDBC drivers are bundled with GeoNetwork, for other databases it is required to download them and copy to $CATALINA_HOME/webapps/geonetwork/WEB-INF/lib.